Design a garden bird house

Tutorial

Design a garden bird house

Level: Collège, Lycée
Difficulty: Débutant

Use our free 3D CAD tutorial to design a garden bird house using CAD principles, sketching, assemblies, and exploded part views in Solid Edge.

Getting Started

Start a new ANSI Inch Part

Begin by clicking the Solid Edge application button in the top left-hand corner of the window. In the menu, click on the New folder, then select ANSI Inch Part.

If « ANSI Inch Part » template is not visible, select the Edit List button at the top of the list, then select ANSI Inch for the templates and click OK.

Settings

Select the Sketching tab, and then open the IntelliSketch options.

On the Auto-Dimension tab, place a check in Automatically create dimensions for new geometry. Select the option for Only when geometry is created with keyed-in values, and then click OK to dismiss the IntelliSketch dialog.

Sketching CAD Parts

Create Front Panel

We’ll begin by creating the front panel of our bird house. Under the Home tab, click on Rectangle by Center.

In the PathFinder on the left, check the box next to Base Reference Planes to show the planes on the base coordinate system.

Hover the mouse over the Front pane (XZ plane) and click the lock icon or press F3 on the keyboard. Click on the Front Face of the view cube in the bottom right corner to change the view.

Now, place the cursor over the origin point of the base coordinate (where the red X axis and the blue X axis meet). The endpoint glyph will appear and click to define the center of the rectangle. Drag the mouse to the side to see the rectangle.

We will key-in (manually enter) the values of the rectangle – use the values below. You can use the Tab key to move to the next field without having to use the mouse.

  • Length: 12.00
  • Height: 5.00
  • Angle: 0.000°

Press enter to set your inputs.

Now, click on the top-right corner of the front face of the view cube to switch to an isometric view – you will see a 2D plane with width and height, but no length or depth.
Click anywhere inside the sketch and select one of the arrows to initiate an extrusion, then move the mouse to the left on the screen.

  • Type in .25 to set the thickness of the part.

You should now see depth to your component.

Save the part

Select the Save As tab under the Application menu to save the file as « Bird House Back ». After that is complete, select the Save As tab again and save it as « Bird House Front ». This creates two identical parts, which we will utilize later. Ensure you are still editing the « Bird House Front » file.

Under the drop down for rectangle by center, select Rectangle by 2 Points and lock on to the front face of the rectangle. Press Ctrl + H to orient the view normal to the sketch plane, then click on the bottom edge of the face to initiate the rectangle.

Use the following values for the new rectangle:

  • Length: 000
  • Height: 4.000
  • Angle: 0.000°

To locate the sketch from the edge of the part, locate Smart Dimension on the home tab. Click and select the left line of the sketch and the left edge of the part. Place the dimensions and set to 500 in.

Press CTRL + I to orient to an isometric view, and click the region inside the newly created rectangle to display the drag arrows. Click an arrow and drag the region through the part, then click again to finish the cut.

Copying features

To copy features, first we need to change the view to the front view. Then, select the cutout feature in the PathFinder on the left side of the screen.
Select the Mirror command and select the Z-Axis (Right Plane) to mirror the cutout to the right side of the part. Save the part and then close the file.

Creating the Side Panels

Now, we’ll move on to creating the side panels for the bird house.

Like before, we need to start a new ANSI Inch part – this time, we’ll create a 7 inch by 7 inch square. Using the rectangle by center command, lock on to the front plane and click on the origin of the base coordinate system (0,0). Use the values below.

  • Length: 7.000
  • Height: 7.000
  • Angle: 0.000°

You can use the line command to create two lines that start from the mid-point of the top line and reaches to each vertical line on the left and right of the rectangle.

Add a Smart dimension by selecting the angled line near the endpoint, then select the bottom horizontal line near the corresponding endpoint. Click to place the dimension and key-in 5.000 for the distance.

On the Home tab, select the Equal Relate command and click on both angled lines. Add a dimension from the top line to the bottom line of the square, then press the ESC key.

Press CTRL + I and click on the center region that is in the shape of a pentagon. Extrude this shape 0.250 inches. Click the check mark next to Sketches in the feature tree to hide the sketch. Click the check box next to PMI in the feature tree to hide the dimensions.

Adding Material Properties

Adding Material Properties will tell the system what type of material the components are supposed to be – this can be used for display, part lists, calculating weight, and more advanced features covered in other tutorials.

To add material properties, in the Pathfinder, double-click on « Material (None) » to open the Materials Properties dialog box. Expand Non-Metals and then expand Woods to select Wood, Pine. Click on « Apply to Model » to add the material properties to your part.

Adding Color to Parts

Adding color to your parts can help them stand out in your drawing and allow for easier visualization of the final product.

To add color to your part, select the View tab at the top bar and then select Part Painter in the style command bar. Set the Style to Teal, and set Select to face. Click on the front face of the part to add color to that side of the part.

Save the part as « Bird House Side », then close the part.

Create Bottom Panel

Now that we’ve created four walls, we need a floor for the birdhouse.

Again, start a new ANSI part. This time, let’s use the Box command to create a box that is centered on the Top plane (X,Y Plane), centered on the coordinate system. Use the following measurements:

  • Length: 5.000
  • Width: 7.000
  • Angle: 0.000°

Add the same « Pine » Material Property to the part, but this time right-click on « Material (None) » and under recent materials, select « Wood, Pine » from the top of the list.

Save the part as « Bird House Bottom ».

Assembling the Bird House

Now we’ll begin assembling the bird house. To begin, start a new ANSI Inch Assembly File (note the difference from a « Part » file).

On the left side of the window, select the Parts Library tab, and navigate to the location where you have saved the Bird House parts. Double click on « Bird House Bottom » to load it into your assembly file. Notice that the bottom panel is immediately placed at the center of the coordinate system; the part coordinate system is automatically aligned with the assembly coordinate system.

Now, drag and drop the part « Bird House Side » to load it into your assembly. The part is now ready to start relating to the Bottom part.

Select the bottom edge face of the Side panel and align to the bottom face of the Bottom panel.

Right-click to exit assembling the parts to see which face was painted teal. Once you’ve identified the painted side, run the Assemble command. Select the side opposite the teal side and mate it to the short edge face of the Bottom panel. Finally, select the side edge face of the Side panel and align to the long edge face of the Bottom panel.

Drag another copy of the Side panel from the PathFinder into the window and repeat the previous steps for the other side of the bird house. At the end of each placement, the teal-painted side should be pointing outward.

Save the assembly as « Bird House ».

Adding the front and back panels

From the Parts Library, drag in « Bird House Front » to load it to your assembly.

Select the near face of the Front panel and select the long edge face of the Bottom panel. Initially, this will Align the faces. Select the Flip button to create a Mate between the parts.

Then, align the side edge face of the Front panel to the teal side of the Side panel. Align the bottom edge face of the Front panel to the bottom edge face of the Bottom panel. This should place the front of the bird house properly.

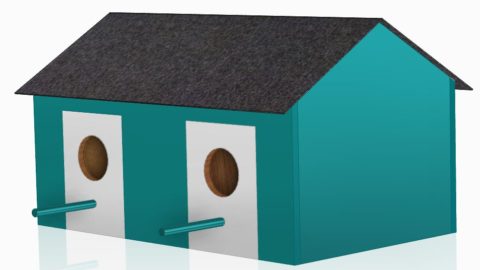
Repeat the above step to achieve the same results for the « Bird House Back » part. The assembly should look like the image shown.

Save the assembly.

Edit parts in an assembly

To edit the Front panel, select the panel in the Graphics window. A small dialog box will appear with two icons. Select the icon to Edit in Place.

Assign the « Wood, Pine » material property to the part by right-clicking on « Material (None) » and selecting it from the top of the list of recently used materials. As before, use the Part Painter to apply Teal to the front and short sides of the Front panel. Click the Close and Return button to exit the part editor and return to the assembly.

Now, do the same for the back panel, making sure to paint the outside faces.

Save the assembly.

Creating Parts in the Assembly

On the Home tab, select Create Part In-Place. Make sure the following default options are selected:

  • Active assembly location
  • Coincident with assembly origin
  • Create component then edit in-place

Click OK to dismiss the window and continue. Make sure that the template being used is set to « ansi Inch part.par » and set the material to « Wood, Pine » from the drop-down list. Click the green check box and save the part as « Bird House Door ». Notice that Solid Edge immediately places you in the part mode – this is because the option to « create and edit in place » was selected.

Select the Project to Sketch command on the Home tab. Hold down the Shift key to enable selecting faces from the background parts, and select the Front face of the Front panel, then click the lock icon to lock on to that plane. Accept the default Project to Sketch options, and dismiss the dialog box.

Select all four edges of the left cutout in the Front panel to project onto the plane. Note the lower edge is projected from the Bottom panel.

Now, a region has been created that can be extruded to create the door. First, let’s add two circles.

Select the Circle by Center Point command and key-in 1.5 inches for the diameter. Touch the top sketch edge with the cursor to highlight the midpoint, then drag the circle straight down to establish a vertical relationship to the midpoint. Click to place the circle. Add a Smart dimension from the bottom edge to the center of the circle. Click to place the dimension and key-in 2.5 inches to locate the center vertically. Using the same method, add a .25 inch diameter circle centered horizontally and 1 inch from the bottom.

Press CTRL + I, then click the region outside of the large circle and in the QuickBar change the extent type to From-To.

Select the long edge face of the Bottom panel (visible in the other cutout) as shown for the To face. Using Part Painter, paint the front face « White ». Save the part, then click the red « X » labelled Close and Return.

Relate the door to the assembly and add second door

Even though the door was created in-place, the part is not constrained to the assembly yet. To accomplish this, we’ll click on the door and then select the Assemble command.

Align the front face of the Door to the near face of the Front panel. Mate the top thickness face of the Door to the top thickness face of the opening in the Front panel. Mate the side thickness face of the Door to the side thickness face of the opening on the Front panel. In both cases, you can hover the mouse and right click; Quick Pick will likely be needed to select the correct face.

Now that the first door has been added to the assembly, the assembly relationships can be captured to make placing the second instance of the door easier. Select the first door and run the Capture Fit command. Accept the relationships by clicking OK on the dialog. From the PathFinder, drag another copy of the Door into the graphics. Notice the first face highlights on the new door and all that is required is to select the corresponding faces on the Front panel.

Save the assembly.

Create wall divider

Use Create Part In-Place to define a new ANSI Inch Part using the default options and assign Wood, Pine. Save the part as « Bird House Center ».

In the PathFinder, display the part reference planes by clicking on the box next to the Base Reference Planes. Hide the first instance of the Side panel by unchecking it in the Assembly PathFinder.

Select the Project to Sketch command and select the Right (Y,Z) plane.

Accept the default Project to Sketch options, then change the view to the right side using the view cube. Select the angled top edges and side edges of the Side panel and the top edge of the Bottom panel.

Press CTL+I to transition to an isometric view, then click on the region inside the sketch and select the arrow to begin the extrusion. Change the extrusion type from From-To to Finite. Select the symmetric button to the right of the extend type, and extrude the part .25 inches.

Close the window and return back to the assembly to show the side panel again.

Save the assembly.

Create metal roof

Now that we have the walls, floor, and divider in place, we need to create a roof. Instead of using Pine Wood as we have before, we’ll use metal for a more durable and weather-proof bird house.

Run the Create Part In-Place command and accept the default settings. Change the template to « ANSI Inch Sheet Metal.psm », and set the material to Galvanized Steel. Accept and save the sheet metal part as « Bird House Roof ».

Using the Rectangle by Center command, press and hold the Shift key down while hovering over the angled edge face of the Center panel. When the F3 lock icon appears, press F3 to lock on to that plane.

Then, press CTRL+H on the keyboard to make the sketching view return normal to the locked-on plane. Key-in the following measurements for the item on the QuickBar:

  • Width: 5.000
  • Height: 12.500

Move the rectangle to the center of the coordinate system and align to the Y axis. Click to place the rectangle and set the angle to 0.000°.

On the Tools Tab, enable Peers Edge Locate. On the Home tab, using the Connect relationship to connect the midpoint of the upper horizontal sketch line to the midpoint of the upper thickness edge of the Center panel as shown:

Press CTRL + I to return to the isometric view. Select the region and extend the sheet metal material thickness away from the assembly.

Click the top edge (at the peak) of the sheet metal part and select the short arrow that is pointing perpendicular to the selected face to add a flange. Change the material side to Material Outside in the QuickBar, and set the length to 5.000 inches. NOTE: The default 90.00° angle is not correct.

From the Face Relate group on the Home tab, select the Coplanar relationship. Select the bottom face of the roof flange and accept with a right click or green checkmark. Select the top edge of the side panel to align with.

Save the part and return to the assembly. You will notice interference with the Front and Back panel, which we will address later. For now, click on the roof and select Assemble on the home tab. Select the underside face on the roof tab to mate to the top angled edge face of the Side panel. Repeat to mate the bottom face of the Roof flange to the other angled face of the Side panel.

Set the offset distance of the Flashfit alignment relationship to -0.25 inches. Select the end thickness face of the Roof first to create an offset alignment to the outside teal face of the Side panel.


Fixing the Front and Rear Wall with the Roof

We can see that the edge of the front and rear walls are protruding out of the roof – not ideal if we want to keep the birds dry. To fix this issue, we will use the same Coplanar relate command that we used to change the angle of the Roof flange.

Click on Bird House Front. Select the icon on the right side of the menu to edit the part. On the Home tab, run the Coplanar command from the Face Relate section. Select the top edge face of the Front panel and right click or press enter to accept. Select the underside face of the roof as the target, then close and return to the assembly.

Click on Bird House Back. Select the icon on the right side of the menu to edit the part. On the Home tab, run the Coplanar command from the Face Relate section. Disable the Symmetric Design Intent by typing S or unchecking Symmetry in the dialog. This will prevent the bottom edge of the panel moving symmetrically when the top edge is angled. Select the top edge face of Back panel and right click or press enter to accept. Select the underside face of the Roof as he target. Close and return to the assembly.

Save the assembly.

Create Bird Dowel Rod

Create a new part in-place using the “ansi inch part.par” template and the default options. Set the material to « Wood, Pine », and save the part as “Bird House Dowel Rod”.

Select the Cylinder command under the Box command pull-down menu on the Home tab. While pressing and holding the Shift key, move your cursor to the inside edge of the hole in the Door panel to select the inside face to lock to.

Find the center of the small circle in the Door to locate the center of the cylinder and click. Set the diameter by locating the edge of the hole in the Door or by keying in .250 inches diameter. Extend the cylinder 75 in. to the outside of the assembly. NOTE: If the extrusion is extending symmetrically, press the Shift key to symmetry off.

Use part painter to paint the entire body Teal. Close and return to the assembly.

Select the Dowel part and pick Assemble on the Home tab. Click the cylindrical shaft of the dowel to align with the bottom hole on the Door panel.

Change the relationship type to Planar Align in the Assemble QuickBar.

Select the end face of the Dowel shown and align to the inside face of the Door panel. HINT: Hovering the cursor over the inside circular edge of the large hole in the Door makes it easier to select the inside face.

Now that the first Dowel has been added to the assembly, the assembly relationships can be captured to make placing the second instance of the Dowel easier. Select the first Dowel and run the Capture Fit command, as we did with the Door earlier. Accept the relationships by clicking OK on the dialog.

From the Pathfinder, drag a copy of the Dowel from PathFinder into the graphics window. Notice the cylindrical face highlights on the new Dowel and all that is required is to select the corresponding hole in the other Door panel. Select the inside face of the other Door as the target for the planar alignment.

Save the assembly.


Now step back and admire your 3D-CAD birdhouse! With the tricks and tips given in this tutorial, you can edit and enhance your Bird House to make it a true mansion, have it fit in a clever location, or just make it customized to your taste. After you’re done, be sure to show off your creation by posting a picture on our Facebook page or Tweeting to us using the #solidedge tag!